Introduction
For those of you who are lucky enough to have a PowerMac
8600, 9600, or Beige G3 MT (or any server thereof), this article is there
to show you how you can install harddrives in your machine, even in places
that weren't originally designed to contain one.
This article stands
in close relation to my earlier report on doubling
the harddrive capacity of the K1/K2 case.
It does make sense to read that article, before you go on here.
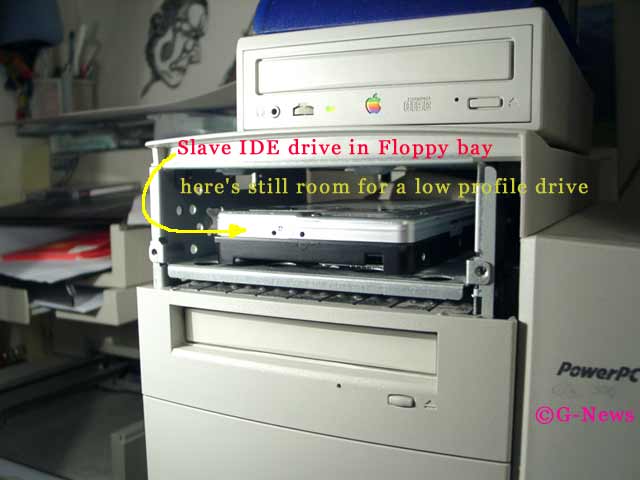
Installing
a HD in the floppy bay
Actually, as a result
of the easy accessibility of the K1/K2 case, installing a harddrive has
never been easier.
All you have to do is:
- open up the side cover with the green button
- remove the plastic bezel of the desired drive bay by lifting up the plastic latch
- unscrew the metal bezel behind it with a screwdriver
- disconnect the cables of the drive's back (IDE or SCSI flatribbon and power, audio cable in case of a CD-ROM)
- pull out the metal drawer the drive sits on with moderated force
- turn the drawer with the drive upside down and carefully remove the 4 screws that hold the drive
- remember the holes that were used in case you're going to install the same kind of drive
- remove the old drive and replace it with the new drive or the drive cluster, as seen in this article
- screw the new unit back onto the drawer
- push the drawer back into the bay using the sliders provided
- reattach the required cables on the back (this can also be done before sliding it back in, might be handier in case of 3.5" drives)
- put back on the metal and plastic bezels
- close her up and get her going (the Mac)
Of course you must make sure that SCSI termination and IDs are set properly in case of SCSI drives, and that master/slave mode is set properly for IDE drives. Refer to the drives manual or the manufacturers website for configuration specifications of your drive.
You may also need to get a
master/slave IDE cable (40 pin) in case you want to install extra IDE/ATA
drives.
(Rev. B and C ROM equipped Beige G3s only) or a longer SCSI flatribbon
cable (50pin) to be able to connect additional drives. You may also run
out of power connectors, that will require you to go buy a Y-cable for
that. (about 2$)
The pictures below should give you some more information:


Problems aka FAQ
There are usually no problems with this at all, of course with a few exceptions:
- Beige G3s with Rev. A
ROM do not support master/slave mode on their built-in ATA interface:
Get a Rev. B or later ROM (really hard to get these days) or get a PCI ATA controller card (Sonnet, Acard etc) - SCSI drives can get quite
hot and it is probably not a good idea to stack them too much:
Avoid stacking high performance SCSI drives or other drives that get very hot. - Attaching and detaching
the cables can be a pain in the behind:
Pull them out through the bay and connect or disconnect them then. - "I really can't
give up my floppy drive":
Believe me, you can. - Where can I get new bezels
for my case?:
That's a hard question, best thing is probably to look around for it on the web. - Which drive should I
set to be the slave?:
Always take the slower drive as a slave and boot off the master. - Where can I get a Rev.
B or C ROM?:
Last thing I heard is that they're sold out, try places like ebay or other second hand sales.
For further questions and comments, fell free to contact me ba email at: email@g-news.ch
Text:
© by Bensch Blaser, G-News, Mar. 2001, all trademarks are property
of their respective owners.
Pictures: © by Bensch Blaser, G-News, Mar. 2001